The desire to update a website or create something perfect and harmonious leads web designers to realize the need to apply knowledge of geometry. It may seem surprising that, in the era of minimalism, one would saturate website pages with a multitude of elements. But the interesting fact is that geometric shapes play an important role in web design for various reasons.
For example, shapes:
Geometry in web design is inherently simplified and structured, but this doesn't mean designers don’t have space for creativity. Once you begin to understand the meaning behind every design element on a page — even a single one — you’ll also realize that geometric shapes can be used to varying degrees.
The Mystery of Geometric Shapes
When we talk about geometry in web design, a natural question arises — what can shapes really do from a visual or interactive perspective?
General words aside, understanding psychology and how a user feels about a website and what they see on the screen enables web designers to build truly effective projects.
The Polyscape Effect — A Versatile Tool
One of the most artistic techniques is the Polyscape effect, which finds different applications and serves a variety of purposes. For example, the combination of photography and shapes can grab attention, create a visual hierarchy, and make imagery more engaging. You can't just place a triangle over a photo and expect it to work. Geometric elements should be positioned where attention is needed — near text blocks or call-to-action buttons. These same elements can add bold, bright accents to the color palette, increasing contrast and helping users’ eyes navigate the content more easily. Naturally, if a brand’s identity is built on distinct shapes, using them in the background will enhance its uniqueness.

All of this follows the two previous articles where we discussed polygons in web design and abstraction and how to use it . We also promised you, dear readers, one more guide — on how to create a compelling, beautiful, and somewhat complex abstraction in Photoshop, usable as a website background. Enter: the Polyscape Effect.
But first, let’s take a look at some particularly impressive and visually pleasing projects that incorporate geometric shapes in different ways. For example, sites like highstudios , newcastlenow , hiveboxx , gorohov , designkitchen , nitroserv , metmuseum , 212conference all include geometric elements with various purposes. Sometimes they're part of the menu, sometimes a decorative detail, and sometimes a way to emphasize structure. The amount of geometry used also varies from project to project.


The Polyscape Effect in Photoshop
Creating geometric abstractions is always a challenging and fascinating process, whether you're designing an entire page layout or a background image. The fun in creating abstractions is in playing not only with shapes, but with photography too. For example, you can combine photos from different themes, create a complex visual pattern, apply a few effects, and use it as a background. A site with such a background will immediately feel different than one with just a regular photo.
And the shape doesn’t have to be sharp and bright. The edges can be soft or only partially highlighted.
But enough theory — let’s dive into creation in Photoshop . First, decide what types of images to mix. A common approach is combining two different themes: rural and urban. Other popular pairs include countryside and starry skies, or cosmic and city imagery. Note: your chosen photos may include people, animals, or birds — but be careful. It’s difficult to work with such images, and the abstraction can lose its meaning and clarity. You’ll just end up with a decorated image, not a true geometric abstraction.
Our goal is to blend two distinct visual types. We went to unsplash.com and chose these two photos by Bryan Goff and mohammad alizade . They are similar in tone but different in theme, composition, and color.


Open your image and set guides at the geometric center. Go to View → New Guide . In the dialog box, choose Horizontal or Vertical, and set the position to 50%. Their intersection will mark the exact center of the canvas.

Now, create a square selection.
If your image is already square:
If your image is widescreen:

Either way, the corners of your square should align with the guides. To copy the selection onto a new layer, press Ctrl+J.

Without deselecting, choose any color in the color palette and press Ctrl+Backspace to fill the area. Then deselect with Ctrl+D.

Name this layer "Rhombus" and set the blending mode to Overlay. Then double-click it to open Layer Styles and add a stroke: Outer, white, 5px wide, blending mode Overlay.

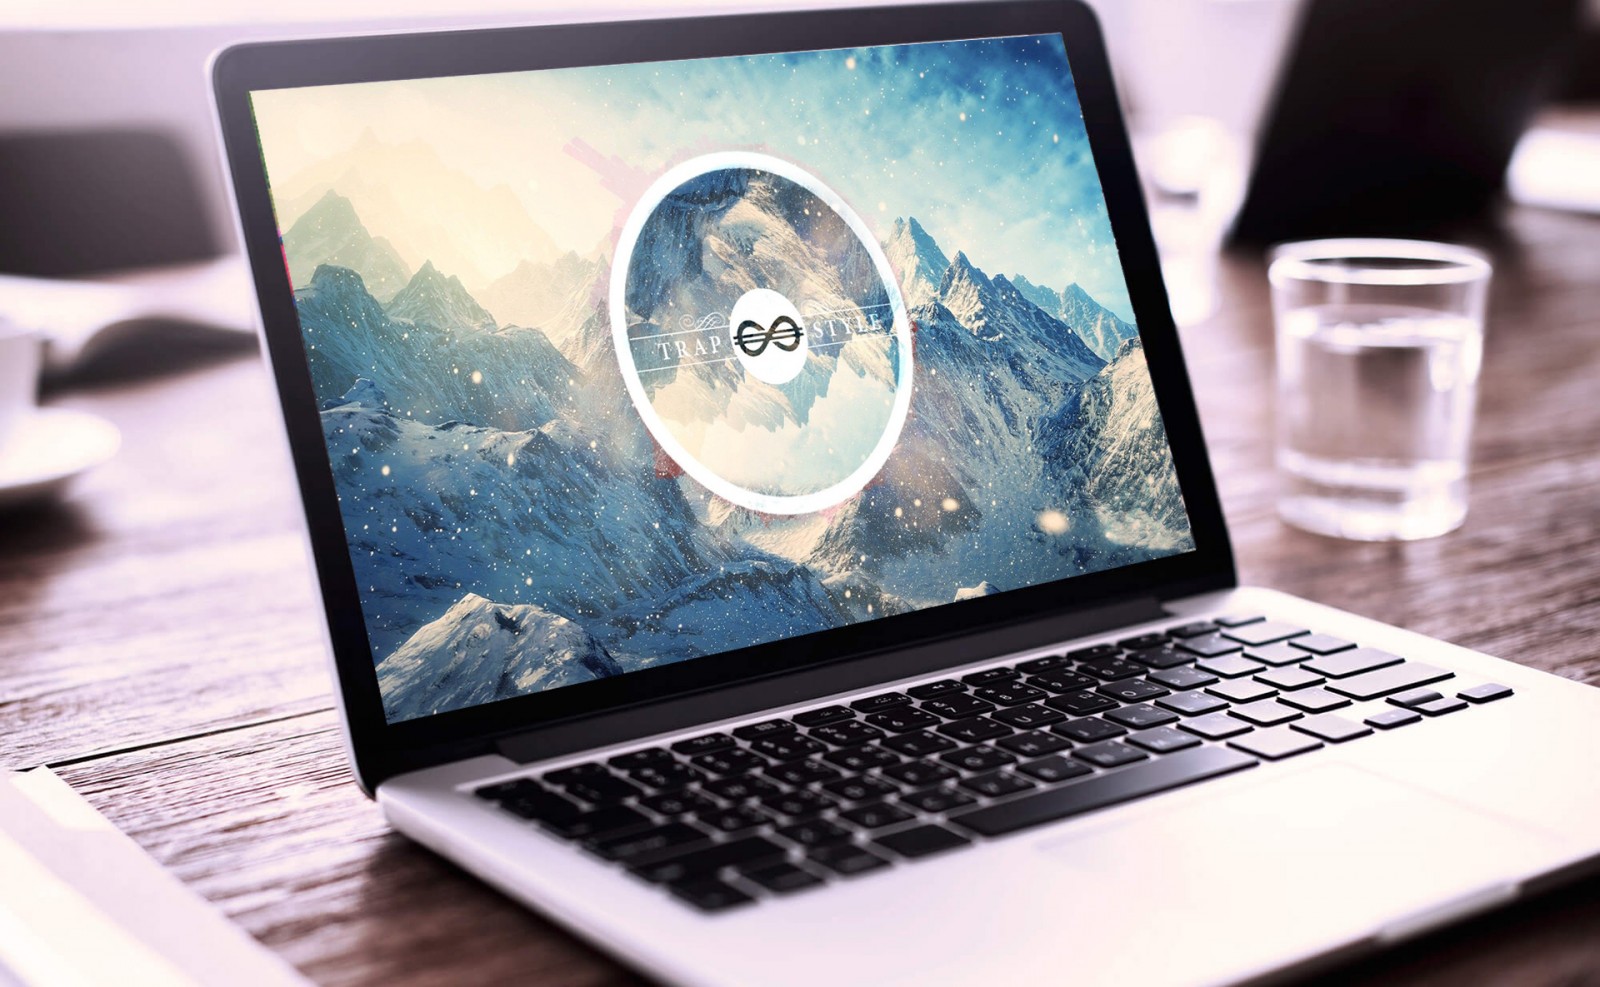
Now go to the image layer, select the Elliptical Marquee Tool , and while holding Alt, draw a circle from the center that’s slightly larger than the rhombus. Copy the selection to a new layer (use your preferred method). Name this layer “Circle” and place it above the Rhombus.

Use Free Transform (Ctrl+T) to flip the circle vertically. This mirror effect is commonly used in Polyscape-style abstractions.

Hold Ctrl and click on the Circle layer thumbnail to select its shape. Right-click inside the selection and choose Transform Selection (not Free Transform), then hold Shift+Alt and scale the selection down to your liking. Press Enter and deselect (Ctrl+D). Now we have a Ring.

Let’s create a triangle next. Choose the Polygon Tool , set the number of sides to 3, and carefully draw the shape from the center without holding any modifier keys. Align it vertically so the triangle’s corners slightly overlap the Ring.

We have another image — of a starry nebula. Place it into the document, then hold Alt and hover your cursor between the nebula layer and the triangle layer in the Layers panel. When the down arrow icon appears, click to create a Clipping Mask. The nebula will now only appear within the triangle.

Select the nebula layer and press Ctrl+T (Free Transform) to adjust the size and position of the image until it fits harmoniously with the rest of the design.
Overall, the Polyscape effect and abstract composition are now complete. You can experiment with blending modes, add photo filters, and apply adjustments.
For instance, you can add a Levels adjustment layer and move the sliders slightly to the right for more contrast. Then add a Hue/Saturation adjustment to brighten the composition.


You can also use Curves to individually tweak the Red, Green, and Blue channels, giving the final image a specific tone or tint.
Another creative option is to duplicate, rotate, or tint your shapes to create a flower-like geometric abstraction.


Open your image and set guides at the geometric center. Go to View → New Guide . In the dialog box, choose Horizontal or Vertical, and set the position to 50%. Their intersection will mark the exact center of the canvas.
Now, create a square selection.
If your image is already square:
If your image is widescreen:
Either way, the corners of your square should align with the guides. To copy the selection onto a new layer, press Ctrl+J.
Without deselecting, choose any color in the color palette and press Ctrl+Backspace to fill the area. Then deselect with Ctrl+D.
Name this layer "Rhombus" and set the blending mode to Overlay. Then double-click it to open Layer Styles and add a stroke: Outer, white, 5px wide, blending mode Overlay.
Now go to the image layer, select the Elliptical Marquee Tool , and while holding Alt, draw a circle from the center that’s slightly larger than the rhombus. Copy the selection to a new layer (use your preferred method). Name this layer “Circle” and place it above the Rhombus.
Use Free Transform (Ctrl+T) to flip the circle vertically. This mirror effect is commonly used in Polyscape-style abstractions.
Hold Ctrl and click on the Circle layer thumbnail to select its shape. Right-click inside the selection and choose Transform Selection (not Free Transform), then hold Shift+Alt and scale the selection down to your liking. Press Enter and deselect (Ctrl+D). Now we have a Ring.
Let’s create a triangle next. Choose the Polygon Tool , set the number of sides to 3, and carefully draw the shape from the center without holding any modifier keys. Align it vertically so the triangle’s corners slightly overlap the Ring.
We have another image — of a starry nebula. Place it into the document, then hold Alt and hover your cursor between the nebula layer and the triangle layer in the Layers panel. When the down arrow icon appears, click to create a Clipping Mask. The nebula will now only appear within the triangle.
Select the nebula layer and press Ctrl+T (Free Transform) to adjust the size and position of the image until it fits harmoniously with the rest of the design.
Overall, the Polyscape effect and abstract composition are now complete. You can experiment with blending modes, add photo filters, and apply adjustments.
For instance, you can add a Levels adjustment layer and move the sliders slightly to the right for more contrast. Then add a Hue/Saturation adjustment to brighten the composition.
You can also use Curves to individually tweak the Red, Green, and Blue channels, giving the final image a specific tone or tint.
Another creative option is to duplicate, rotate, or tint your shapes to create a flower-like geometric abstraction.
Conclusion
The Polyscape effect — or an abstract geometric figure composed of multiple images — is a stunning photo effect that can be created quickly and captivates purely with its visual appearance. Whether or not you use extra filters, it still looks amazing and striking.
Although the photo effect is not new, it continues to generate buzz in the web design world. The reason is simple: it’s both practical and aesthetic. The most important thing to remember is the simplicity of the photographs. They should portray calm scenes and themes, without heavy filters or overexposure. When that’s achieved, you can even insert elements, blocks, menus, or buttons into the geometric shapes instead of just images. This makes the entire layout resemble a photo effect while remaining a geometric abstract composition.
In this simple way, both of our articles have shown you, dear readers, different techniques for creating geometric abstraction or the Polyscape effect — techniques that are still warmly embraced in web design and are unlikely to go out of style anytime soon.